This is default featured slide 1 title

Go to Blogger edit html and find these sentences.Now replace these sentences with your own descriptions.This theme is Bloggerized by Lasantha Bandara - Premiumbloggertemplates.com.

This is default featured slide 2 title

Go to Blogger edit html and find these sentences.Now replace these sentences with your own descriptions.This theme is Bloggerized by Lasantha Bandara - Premiumbloggertemplates.com.

This is default featured slide 3 title

Go to Blogger edit html and find these sentences.Now replace these sentences with your own descriptions.This theme is Bloggerized by Lasantha Bandara - Premiumbloggertemplates.com.

This is default featured slide 4 title

Go to Blogger edit html and find these sentences.Now replace these sentences with your own descriptions.This theme is Bloggerized by Lasantha Bandara - Premiumbloggertemplates.com.

This is default featured slide 5 title

Go to Blogger edit html and find these sentences.Now replace these sentences with your own descriptions.This theme is Bloggerized by Lasantha Bandara - Premiumbloggertemplates.com.

Sunday, May 18, 2014

Sunday, March 9, 2014

Can Blogger Make a Menu Bar That Categorizes Posts?


One of the biggest problems with Blogspot is the menu bar. In WordPress, you can easily and quickly create drop down menus. In order to make that work in Blogger, you need to modify your code.
However, not all is lost. Maybe you can’t have drop down menus without a lot of headache, but you can have categories at the top of your menu bar. You can use your labels as categories.
Let’s say for example you write about food, marriage, and fashion. When someone comes to your site, they may only want to browse through the marriage posts. By creating a menu tab with the word marriage, blogger will pull up only those posts.
Typically a menu bar is only comprised of static pages or outbound links. However, using a simple formula, you can create your labels to work as menu bar items!
If you haven’t created labels yet, you should. Labels are like extra keywords that attach to your post, but if you want to use the labels to help categorize your posts, pick about five or six labels and always use the same label when you are adding it to a post.
Once all your posts are labeled, here’s how to make the menu bar.
1. Login to your Blogspot dashboard.
2. Go to pages.
3. Click on Create New Page.
4. Choose Web Address when the drop down menu bar comes up.
Click on New Page and Choose the Web Address Option.
5. Type in the title as you want it to appear (in our example, type the word Marriage).
6. Now you need to type in a URL.
http://www.[your blog name].com/search/label/[your label]
7. Hit save.
8. Just make sure on your pages page, the option is checked off to show…
show pages as top tabs”
You are all set! Any blog post that uses that label will be pulled up like a filtered archive  (listed according to date).
See? Wasn’t that easy? I cannot believe I didn’t figure this out earlier, but it all happened randomly as I was helping a blogger transition her blog. I knew drop downs required coding, but the search/label function was so simple and I had used it in other functions before, but never thought to use it in the menu bar.
We’ll just chalk it up to a blond moment. Now go spruce up your menu bar!

Posted by  Julie DeNeen on March 29, 2013
http://www.fabulousblogging.com/2013/03/can-blogger-make-a-menu-bar-that-categorizes-posts/

Wednesday, March 5, 2014

How to Install a Blogroll on Blogger

How to Install a Blogroll on Blogger

by Adrian Grahams, Demand Media


  A blogroll allows you to link to your favorite blogs and recommend them to your readers. Providing links to other blogs can also help you to promote your own blog because the blogs in your blogroll might return the favor and link back to you. The Blogger service includes a blogroll gadget called Blog List that you can install on your blog through Blogger’s Design settings page.
Step 1Sign in to your Blogger account to open the default Blogger Dashboard page. Scroll down the Dashboard page to find the blog on which you want to display the Blog List blogroll gadget.
Step 2Click the blue “Design” tab under the blog’s title to launch the Add and Arrange Page Elements section of Blogger’s Design settings pages.
Step 3Click the “Add a Gadget” link in the sidebar section of the page. If you want to display the blogroll at the top or bottom of the page instead of the sidebar, click an “Add a Gadget” link in these locations.
Step 4Scroll to the Blog List gadget in the Add a Gadget window. Click the “+” button to open the gadget configuration window.
Step 5Click the blue “Add to List” button at the bottom of the window. Type the URL of a blog that you want to display in the blogroll into the “Add by URL” field. You can also automatically add the blogs that you follow in Blogger or Google Reader by clicking the relevant radio button. Click the orange “Add” button to add the blog. Repeat this process for each blog that you want to display in the Blog List blogroll.
Step 6Type a title for the blogroll into the “Title” field. Click your preferred display order from the “Sort” drop-down menu. You can choose to display the blogs alphabetically or with the most recently updated blogs displayed first. Select the blog content that you want to show for each blog by clicking and selecting the relevant check box. You can display the blog’s icon, the title of the most recent post, a post snippet and thumbnail image.
Step 7Click the orange “Save” button to store your changes and add the Blog List blogroll to your blog.

Tip

Add new blogs to the blogroll at any time by clicking “Add to List” to add a new blog.


Reference:  http://smallbusiness.chron.com/install-blogroll-blogger-31434.html

Change time zone setting


It's important to choose the right time zone for your blog, so that your posts appear with the correct dates and times. Also, if your time zone is incorrect, Blogger may think some posts are dated in the future, in which case they wouldn't be published.
You can change the time zone of your blog by going to the Settings | Language and formatting tab, and changing the setting for Time Zone under the "Formatting" section. Choose the correct option from the list, and click the orange button at the top to save your settings.

 
Reference:   https://support.google.com/blogger/answer/41963?hl=en

Blogger Template Designer


Blogger Template Designer is a new way for you to easily customize the look of your blog. You can select a variety of templates, images, colors, and column layouts to make your blog an expression of you. To get to the Template Designer, just click on the drop-down menu of the gray Post List icon, and select Template. From there, you'll be able to choose and customize your template.
As you play around with the Template Designer, you’ll see a preview of how the blog will appear based on the choices you’ve made, which you can expand to by pressing the toggle to Expand Preview between the Blogger Template Designer dashboard and the preview. When you’re satisfied with the look of your blog, you can make them go live by pressing Apply to Blog in the top right hand corner of the Template Designer.
To get started with Blogger Template Designer, select a template for your blog from one of the professionally designed templates that are available. Each template appears as a large thumbnail that when clicked will show different variations on the template below that you can select by clicking on them. Note that clicking a new template will erase any customizations you’ve made on a previous template.
Once you’ve chosen a template, you can continue customizing the look of your blog.
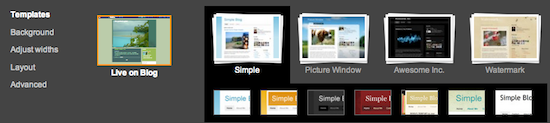
No matter what template you are previewing in Template Designer, you can always see what is currently live on your blog by looking at the Live on Blog thumbnail in the Template Designer control panel. You can also click on it to reset the template in the Template Designer to the live version of your blog.

Background

Even though you’ve chosen a template, you can still change the way that it looks. Using Blogger Template Designer, you can choose the background color or image for your blog and then play with the color scheme. To start customizing your background, click on the thumbnail under Background Image.
One of the best new features of Template Designer is the ability to change the color of your background image. This is possible when a background image has transparency. You can tell that a background image is transparent because it has a checkerboard in the top right hand corner of the image.
Once you’ve selected your image, you can change the color of the background by clicking on Main Color Theme and then selecting the color of your choice.
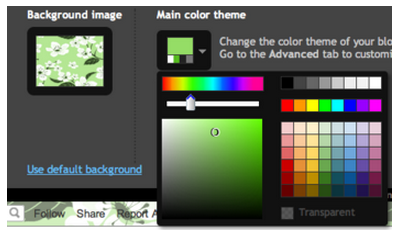
You can only change the color of your background if the background is transparent. Also, if the template that you chose has a grey background, you cannot change its color.
In addition to selecting and personalizing your blog’s background image, you can also choose a color theme to apply to aspects of your blog, including text and links. You can do this by playing with the Main Color Theme or by choosing one of our Suggested Themes. Changing the color theme of your blog will change the colors for all aspects of the blog template that can be changed.
Note: If background image is not transparent, themes will alter the text color scheme of the blog
For information on uploading your own custom background image, please see our article on adding custom CSS to your blog.
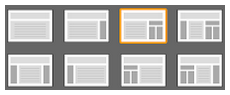
Layout

You can choose a variety of layout options for your blog, from one to three columns. These layouts feature drag and drop functionality for gadgets. You will also have a variety of layout options for the blog footer as well.
If you want to add or remove gadgets or edit gadget settings, you cannot do this through Blogger Template Designer. Rather, you have to do this on the general Layout tab.

Adjust Width

You can change the width of the blog, and the right and left columns by dragging the slider for the different parts of blog layout. Note that the options you see here correspond to the type of layout that you chose. If, for example, you chose a blog with left and right columns, you will see both left and right column sliders. If, however, you chose a blog with only a left column, you will only see that option here.
 
Reference:   https://support.google.com/blogger/answer/176245?hl=en

How to adjust width in Blogger template


Long before starting this blog ‘How To Tech Guru’, I used to blog using blogger during my initial years of blogging. As of this writing, I’m still using blogger to showcase my photography work and write about my camera settings etc. for each of the shots that I have captured. I have made videos on YouTube and have embedded these videos, but these videos when embedded used to appear out of the frame.
One is to change the YouTube dimensions while embedding the video to your blog post and the other is to change the dimension of the post. First is the ideal option, there are other issues. Say, you want to place an ad which is of dimension 300*250 but your sidebar’s width is 240. It’s not that you cannot place your ad but this ad will appear out of the frame. If the sidebar were to be of dimension 300 or 320 then it would have been ideal to place the add. You cannot always go behind searching for a template which has the right dimension and finally you might get the right dimension but half heartily agree for a template.

So, of you are using Blogger then there is an option where you can adjust, modify the way you want to. Adjust width in Blogger option can help you in fixing this issue. Just choose right template for you blog, then just follow the following steps to adjust width in Blogger template that you have selected.
  • Go to blogger dashboard and select the blog for which you need to adjust the width the way you want.
  • Select the ‘Template’ option and under ‘Live on Blog’ click on ‘Customize’. This will take you to ‘Blogger Template Designer’.
  • Here, click on adjust widths as shown in the image below. Note that there are two sliders – to adjust width of entire blog and the other to adjust width of Right sidebar. There can be more sliders depending on the Layout of you blog.
  • There is a live preview just below these adjustment settings. As you move the slider, it will be visible to you. This is the option that I like the most.
  • Remember to adjust the Entire blog slider first and then the right sidebar. Also, do not increase the slider to the max and make you website appear like Full Screen mode.
  • Once you are done adjusting, click on ‘Apply to Blog’ which is to the top right corner.
adjust width in Blogger template
Image: My Photography Blog. http://rjoisa.blogspot.in/

As of this writing we cannot modify or adjust width in WordPress.com and adjust width in Blogger is a new addition which was not available earlier. Note that you can always go back to original settings by clicking on ‘reset widths to template defaults’. 
If you like this post then don’t forget to share it with your friends and follow us on Social Media or subscribe to our blog via email.

Edit the HTML of your blog's layout

If you want more control over the formatting of your blog, you can easily access and change its HTML code:
  1. Go to your Blogger dashboard.
  2. Next to the gray Post List icon, click the drop-down menu and select Template.
  3. Click the Edit HTML button under the "Live on blog" view.
Tip: Change your blog's design without bothering with the code! Check out Blogger's Template Designer to create and apply your own design or a cool one you find from another user.
Here are a few tips for editing your code:
Save a copy first. Before you start editing the code, we highly recommend that you download a copy of your template. If your changes don't come out the way you wanted, you'll be able to revert to the original version by simply uploading that downloaded copy.
Understand Blogger's code. Along with regular HTML and CSS, Blogger also uses many custom tags. It's a good idea to familiarize yourself with Blogger's page element tags and font and color tags before you start.
Find the code for page elements. By default, each page element is shown in the code as a one-line placeholder to simplify the code, whose options can be set in the graphical interface on the Layout tab. Click the drop-down arrows on the left next to the one-liner to display the complete code for a page element, and learn about those elements' widget template tags.
Use our tool for CSS changes. For extensive style changes, you can use the Template Designer to add custom cascading style sheets (CSS) to your blog. If you're not too familiar with CSS, check out this CSS introduction.

 Reference:  https://support.google.com/blogger/answer/46870?hl=en

Change the number of posts displayed on your blog


To change the number of posts displayed on your blog, go to your Layout tab and click "Edit" on the blog post widget.

A window will then pop up with options to change your settings. The first option should be "Number of posts on main page" -- you can adjust that number accordingly, or change the setting to reflect the number of posts, or number of days with posts.


The overall page size is limited to 1 MB, so if you try to list hundreds of large posts all on your front page, you may get a publishing error. Lowering the number of posts displayed should fix this.

Reference:  https://support.google.com/blogger/answer/41394?hl=en

Blog คืออะไร?


หลายๆคนอาจจะสงสัยว่า Blog คืออะไร? แตกต่างจากไดอารี่ online ไหม? แล้วทำไมคำๆนี้ถึงมาแรงจัง ไปไหนๆก็มีแต่ Blog สรุปแล้วมันคืออะไรกันแน่?
บล็อก (อังกฤษ: blog) หรือ เว็บล็อก (weblog) เป็นหน้าเว็บประเภทหนึ่ง ซึ่งคำว่า blog ย่อมาจากคำว่า weblog หรือ web log โดยคำว่า weblog นั้นมาจาก web (เวิลด์ไวด์เว็บ) และ log (ปูม, บันทึก) รวมกัน หมายถึง บันทึกบนเวิล์ดไวด์เว็บ นั่นเอง
ในปัจจุบันบล็อก ถูกใช้เป็นเครื่องมือสื่อสารรูปแบบใหม่ ไม่ว่าจะเป็นการประกาศข่าวสาร การแสดงความคิดเห็น การเผยแพร่ผลงาน ฯลฯ และกำลังเป็นที่นิยมมากขึ้นเรื่อย ๆ โดยขณะนี้ได้มีผู้ให้บริการบล็อกมากมาย ทั้งแบบให้บริการฟรี และเสียค่าใช้จ่าย – Wikipedia
สรุปง่ายๆ Blog ก็คือ Website รูปแบบหนึ่ง ที่มีการจัดเรียง “เรื่อง” หรือ post เรียงลำดับ โดยเรื่องใหม่จะอยู่บนสุด ส่วนเรื่องเก่าสุดก็จะอยู่ด้านล่างสุด
Blog อาจจะพัฒนาขึ้นมาอีกขั้นของ ไดอารี่ online ก็เป็นได้ โดย Blog จะเป็นเรื่องเกี่ยวกับอะไรก็ได้ ไม่จำกัด ซึ่ง ไดอารี่ ก็ถือว่าเป็น Blog ในรูปแบบหนึ่ง
Blog ส่วนใหญมักจะเขียนโดยคนเพียงคนเดียว แต่ก็มีไม่น้อยที่เขียนเป็นกลุ่ม โดยอาจจะมีเรื่องราวเฉพาะไปที่ๆเรื่องประเภทเดียว หรือบางทีก็หลากหลาย ซึ่งส่วนใหญ่เรื่องราวที่เขียนขึ้นมานาน จะถูกเก็บรวบรวมเป็น Archives เก็บไว้ โดยมักจะแสดงผลเป็น link ในรูปแบบ วันเดือนปี เพื่อให้เราสามารถกดเข้าไปดูได้ ก็ไม่ต้องตกใจว่าที่หน้าแรกของ Blog บางทีก็มีเรื่องแสดงแค่ 10 เรื่องก็หมดแล้ว เพราะบางทีใน Archives อาจมีเรื่องอยู่ในนั้นอีกเป็นร้อยๆ โดยที่เราต้องเข้าไปดู
Blog มักจะมาคู่กับระบบ Comment ที่เปิดโอกาสให้คนอ่าน สามารถ Comment ข้อความต่อท้ายในเรื่องที่เรา post ได้ คล้ายๆรูปแบบของ Webboard ไม่ว่าจะเป็นติชม แสดงความคิดเห็นเพิ่มเติม หรือบอกแหล่งข้อมูลใหม่ๆ หรืออาจจะแค่ทักทายเจ้าของ ฺBlog ก็เป็นได้ ถ้าคุณลองเลื่อนไปดูด้านล่างของเรื่องนี้ จะพบช่องให้กรอก Comment ทิ้งข้อความไว้ให้ผมได้ :D
Blog อาจจะมีบริการทั้งเสียเงิน และไม่เสียเงิน ขึ้นอยู่กับรูปแบบของการให้บริการ ซึ่งมักจะติดตั้ง Tool ให้เราสามารถใช้งานได้ง่ายๆ โดยที่ไม่จำเป็นต้องมีความรู้ด้านคอมพิวเตอร์มากมายนัก
โดยส่วนใหญ่แล้ว Blog หลายๆที่มักจะให้ข้อมูลที่เป็นประโยชน์และลึก เนื่องจากเจ้าของ Blog มักจะนำข้อมูลที่ตัวเองรู้ หรือประสบการณ์มาถ่ายทอด โดยค่อนข้างเป็นกันเอง
แต่ในปัจจุบัน บริษัทใหญ่ๆ ก็หันมามี Blog เป็นของตัวเองกันมาก ไม่ว่าจะเป็น Google , Yahoo เพราะ Blog สามารถทำตัวเป็น PR ให้กับบริษัทได้ โดยสร้างความรู้สึกเป็นกันเอง ไม่มีพิธีอะไรมาก สามารถสื่อสารกับลูกค้าได้โดยตรง โดยไม่ต้องเป็นทางการมากนัก และลูกค้าก็ชอบที่จะติดต่อสื่อสารผ่านทาง Blog ด้วย
ปัจจุบันในเมืองไทยมีผู้ให้บริการ Blog อยู่หลายที่ เช่น Bloggang, exteen หรือ BlogKa
หรือต่างประเทศเช่น Blogger, WordPress, MySpaceแล้ววันนี้คุณมี Blog ของตัวเองแล้วหรือยัง?
Reference:  http://www.basicstep.net/about-basicstep/

Tuesday, March 4, 2014

Delete your blog


If you delete your blog, it will no longer be available online and will be permanently removed from your list of blogs on your Blogger Dashboard. Here's how to delete your blog:
     ⦁    Sign in to blogger.com and access your Blogger Dashboard.
     ⦁    Beside the blog you want to delete, click the drop-down menu to the right of the gray Post List icon.
     ⦁    Select Settings.
     ⦁    Click Other (under Settings) on the left side of the page.
     ⦁    At the top of the page under "Blog tools" click Delete blog.
     ⦁    Click Delete this blog.
The title of the deleted blog will appear in the "Deleted blogs" section for a short time after you delete your blog. During this time period, you can click Deleted blogs on the left side of your Blogger Dashboard to see the titles of your recently deleted blogs.

Ref. : https://support.google.com/blogger/answer/41387?hl=en